
Setup SMTP Mail from Dynamics 365 Business Central Online or BC18 On-Premises
- Tabrez Ajaz
- Jun 21, 2021
- 3 min read

Hello explorers,
In this article, I will show you how you can setup and sent SMTP Mail from Dynamics 365 Business Central 2021/Wave1 release. If you are using current 2021/Wave 1 release then I hope you already seen below message on SMTP Mail Setup Card Page: Enhanced email capabilities are available as a replacement for this legacy feature.

SMTP Mail Setup
But if you are using older versions like BC version 17 it’s still there, in 2021/Wave 1 release Microsoft marked Table “SMTP Mail Setup” and Codeunit “SMTP Mail” for removal so now we have to use “Email – SMTP Connector Extension” instead of using old Legacy SMTP Setup.
This article is all about setting up an email account using SMTP configurations in next article I will wrote an article to show you, how we can sent email using AL Code but in this let’s add/configure an email account for SMTP first.
Configure SMTP Email Account
I my case, I am going to use my personal email account iamxxxxx@outlook.com, and follow below steps along with me:
Step 1: Search for Email Accounts and choose the related link

Figure 1: Search and select “Email Accounts” link – it’s a List page
Step 2: On “Email Accounts” page – click on New and Choose “Add an email Account“

Figure 2: Add a new email account action
Step 3: After click on Add an email account below page will be shown, click on Next Button on this screen:

Figure 3: Setup an Email Wizard
Step 4: Next page will show list of email account type that you can add, so I my case I am adding my personal email ID so I will prefer SMTP type and configure the email using Outlook SMTP settings:
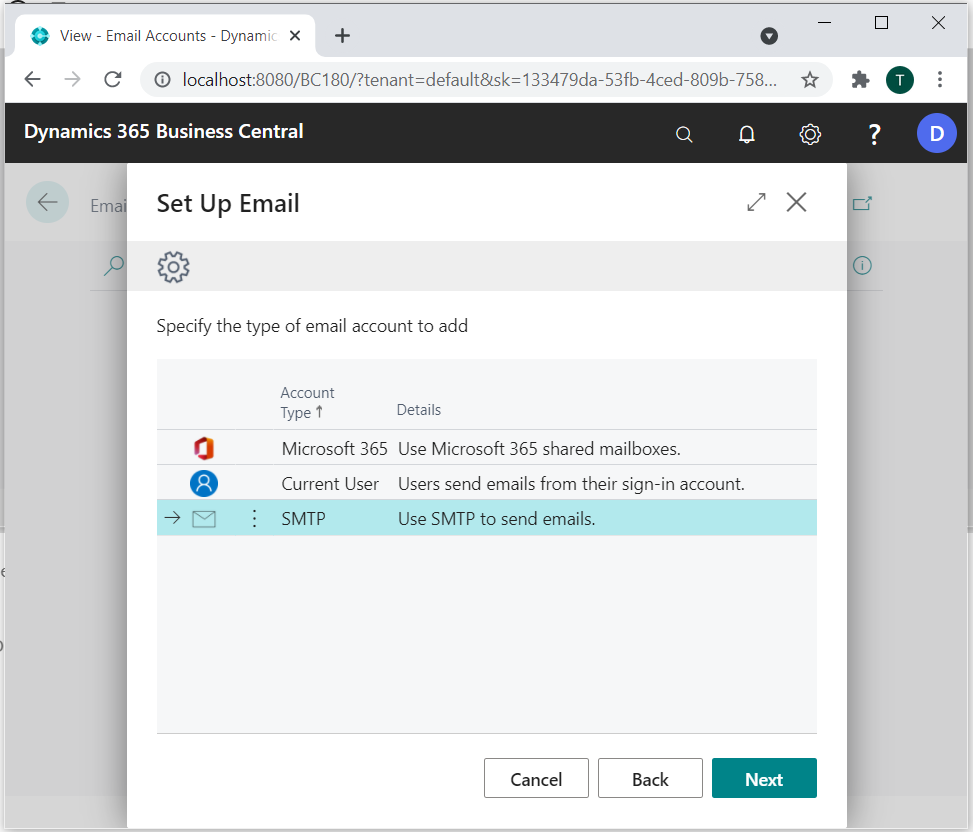
Figure 4: Select email account type in my case for personal email id choose SMTP
Step 5: When you click on Next button after selecting SMTP type below page will appear where you have to provide the SMTP server, port, and user credential…

Figure 5: Setup SMTP Account
OUTLOOK SMTP SETTINGS * Server Address: smtp-mail.outlook.com * Username: Your Outlook Email Address (e.g. username@outlook.com) * Password: Your Outlook Password * Port Number: 587 (With TLS) * Alternative Port Number: 25 (Without TLS/SSL) * Sending Limits: 300 Emails a day or 100 recepients a day.
GMAIL SMTP SETTINGS * Server Address: smtp.gmail.com * Username: Your Gmail Email Address (e.g. username@gmail.com) * Password: Your Gmail Password * Port Number: 587 (With TLS), 465 (With SSL)
Step 6: Click on Next and you will see a congratulation message on the screen, it means you have configured SMTP setup successfully.

Figure 6: Congratulation page – After Successfully configuration of Email Account
To test it is configured correctly or not click on Send Test Email button and choose you email address to sent test email or any other email address, after selecting the email id click on OK, and check you email, if you got a test email means everything is ready now and we can start sending emails from the system.

Figure 7: Send Test Email
You will see below popup if mail sent successfully.

Figure 8: Test mail sent successfully.
Let’s check the Mailbox, you must received a test mail something like as shown below:

Figure 9: Received test mail in the Mailbox.
I hope you can also configure SMTP Mail on your Business Central Instance and can start sending email notifications to your customers/vendor or anyone. In the next articles, I will tell you how you can send email using AL Language.
Don’t forget to Like this post and follow this blog, so you can get the latest content.


Comments